Firmware test slides
For the ODMB7 production, we have developed tests to verify the functions of the board. Find the details of these tests in these slides:
VME baseline test
Optical loopback test
LED test (video)
Installing ModelSim and ISE in linux
We will use UCSB online licenses to run these programs, and these can only be accessed from the UCSB campus. Thus, it will be necessary to install the UCSB VPN. Each time before running these programs off-campus you will need connect to the VPN with your UCSB NetID.
These programs are in linux, which can be run on Mac and Windows with a virtual machine. See instructions below for the installation of VirtualBox, a free virtual machine.
Create two directories, $ISE_DIR and $MODELSIM_DIR, in your local machine (you'll need ~20 GB free).
Add the following export commands to your .bashrc:
export XILINXD_LICENSE_FILE= [Ask Alex Dorsett or Hualin Mei]
export LM_LICENSE_FILE= [Ask Alex Dorsett or Hualin Mei]
export LD_LIBRARY_PATH=/usr/lib/:${LD_LIBRARY_PATH}
export LD_LIBRARY_PATH=/usr/lib32/:${LD_LIBRARY_PATH}
export CVS_RSH=ssh
export CVSROOT=:ext:${USER}@cmscvs.cern.ch:/local/reps/CMSSW
export PATH=$MODELSIM_DIR/modeltech/bin:$PATH
export MGC_HOME=$MODELSIM_DIR
The fourth line may be unnecessary (and probably non-existent for 32-bit operating systems). You might also need to run
the following lines in the terminal in 64-bit Ubuntu 16.04:
sudo apt-get install lib32z1 lib32ncurses5 lib32stdc++6
sudo apt-get install libxtst6:i386 libxi6:i386
sudo apt-get install libxft2:i386 libxft-dev:i386
sudo apt-get install ubuntu-desktop
Installation of VirtualBox to run linux on macOS
These programs only run on linux (and Windows), so if you have a Mac you will need to have a linux partition or run it virtually. The latter is slightly slower but vastly more convenient if you are used to using macOS in your daily life. The instructions below are based on this website- Download and install VirtualBox 5.1.22. You can try with newer versions, but I stopped there since Ubuntu was crashing with 5.1.24.
- Download Ubuntu. I stopped upgrading at 16.04.
- In VirtualBox "Settings", go to the "Storage" tab and click the CD with a "+" next to Controller IDE to add a new optical drive. Click “Choose disk” and select Ubuntu’s .iso file. Click start to install Ubuntu, and check "Download updates while installing” and “Install this third-party software"
- Increase the processors, RAM, and video memory that you give the virtual machine in Setting.
Video memory can go up to 256 MB with this command in macOS's terminal
VBoxManage modifyvm "ubuntu" --vram 256
- Add a shared folder in VirtualBox to share files betwen macOS and Ubuntu.
- Created a ~/Documents/ubuntu folder in macOS.
- In VirtualBox, Settings icon -> Shared Folders, added the new folder clicking on the icon with the green “plus”, and setting "Auto-mount” and “Make permanent".
- Install Virtualbox guest additions for Ubuntu with the Contents/MacOS/VBoxGuestAdditions.iso file inside VirtualBox.app, and load it in Ubuntu. More detailed instructions here if needed.
- Give yourself the appropriate permissions in a terminal inside Ubuntu
sudo adduser $USER sfvbox
Installation of Mentor Graphics ModelSim
Copy the ModelSim executables (691 MB) and compiled Xilinx libraries (2.1 GB) from the UCSB servers (needs an HEP account) by typing the following commands in the terminal:cd $MODEL_SIM
scp -r $USER@tau.physics.ucsb.edu:/net/cms27/cms27r0/odmb/modelsim_and_libs/ .
sudo mv data / ## You will need sudo privileges to write there
sudo chmod -R 755 /data
cd modelsim
./install.linux ## Install it in $MODELSIM_DIR and check all folders when prompted
Installation of Xilinx ISE
Copy the ISE executables (6.1 GB) from the UCSB servers (needs an HEP account) by typing the following commands in the terminal:cd $ISE_DIR.
scp -r $USER@tau.physics.ucsb.edu:/net/cms27/cms27r0/odmb/ise/Xilinx_ISE_DS_Lin_14.7_1015_1.tar
tar xvf Xilinx_ISE_DS_Lin_14.7_1015_1.tar
cd Xilinx_ISE_DS_Lin_14.7_1015_1
./xsetup ## Install it in $ISE_DIR and follow the instructions in the GUI installer
Set up the ODMB firmware
- git clone git@github.com/odmb/odmb_ucsb_v2.git # Checks out the latest ODMB firmware
- Open ModelSim by connecting to the VPN, opening the virtual machine, and typing "vsim" in the Ubuntu terminal.
- Go to "File > Open Project" and open the file odmb_ucsb_v2_linux.mpf
- In the "Library" tab of ModelSim, right-click on "hdlmacro", "secureip", and "unisim" and select "Refresh".
Simulation of the ODMB firmware
The simulation of the ODMB firmware uses a "test bench" (source/modelsim/odmb_ucsb_v2_tb.vhd) that simulates the signals that the VME crate sends the ODMB. The specific VME commands are written in text files stored in commands, and the text file is specified and read by source/modelsim/file_handler_linux.v. To run the firmware, do the following:- Open ModelSim by connecting to the VPN, opening the virtual machine, and typing "vsim" in the Ubuntu terminal.
- Right-click on any file in the "Project" tab and select "Compile > Compile All"
- Double-click on "run_simulation" in the "Project" tab
- In the "sim" window, select the modules you want to see the signals of and type "Ctrl + W" (typically odmb_v6_v2_TOP, MBV, MBC and a few others). Alternatively, you can right-click and select "Add to > Wave > All items in region."
- Control the run with the "simulate" buttons. Start with the button with a downwards arrow and a line.

- In the wave window you see the full range typing "F", and zoon on the cursor with "C"
Synthesizing the Firmware
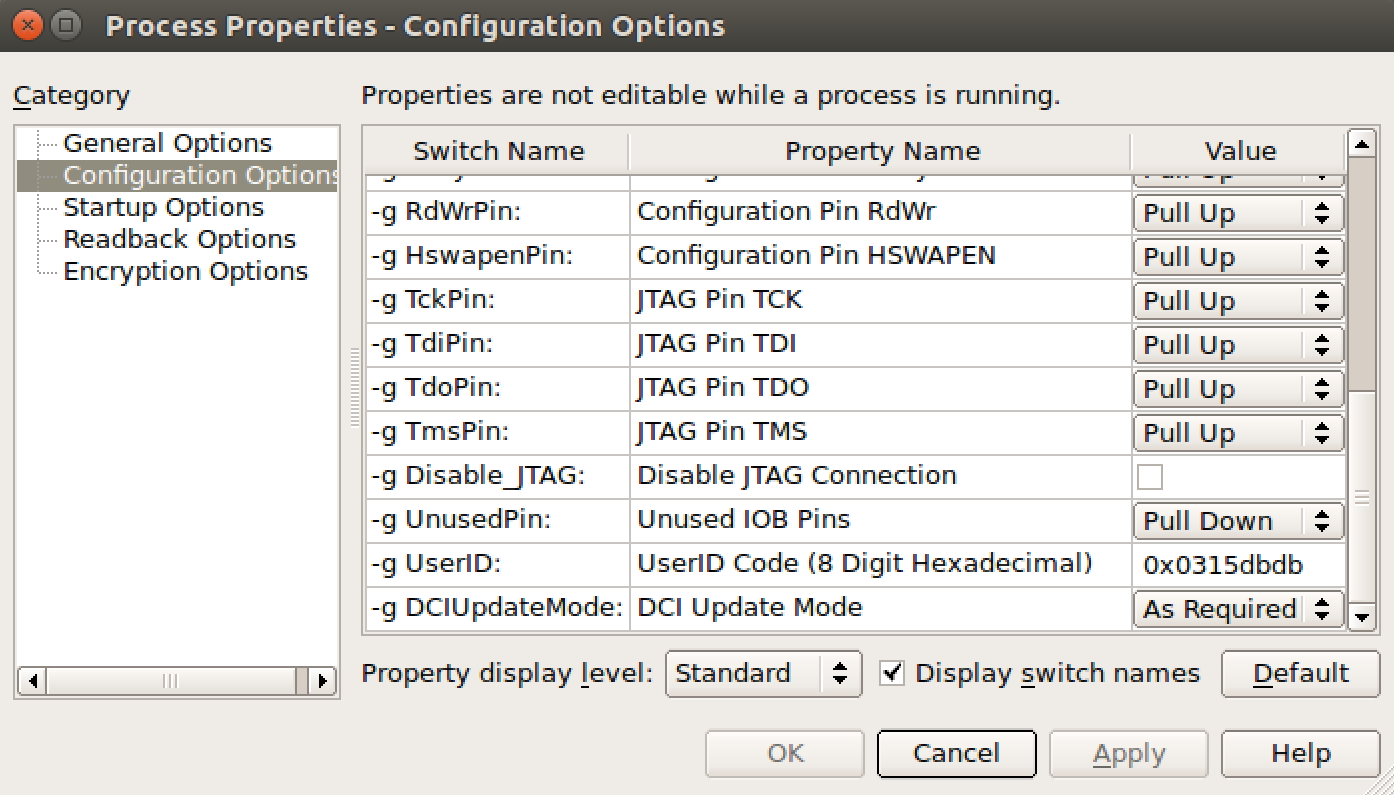
Once you have cloned to ODMB firmware and made changes, you will next need to synthesize it before being able to run it. For this, you will need the ISE software installed (refer to the installation directions above). Once you have this, launch ISE with the command $ISE_DIR/14.7/ISE_DS/ISE/bin/lin64/ise. In the bottom-left menu, right click on 'Generate Programming' and select the submenu 'Configuration Options'. Here you should scroll down to the bottom of the list, and change the '-g UserID' corresponding to the firmware version you specified in ‘vmeconfregs’. This menu is shown below in Figure 1. NOTE: If you did not update the firmware tag yourself, make sure to do so before continuing if you have changed the firmware.
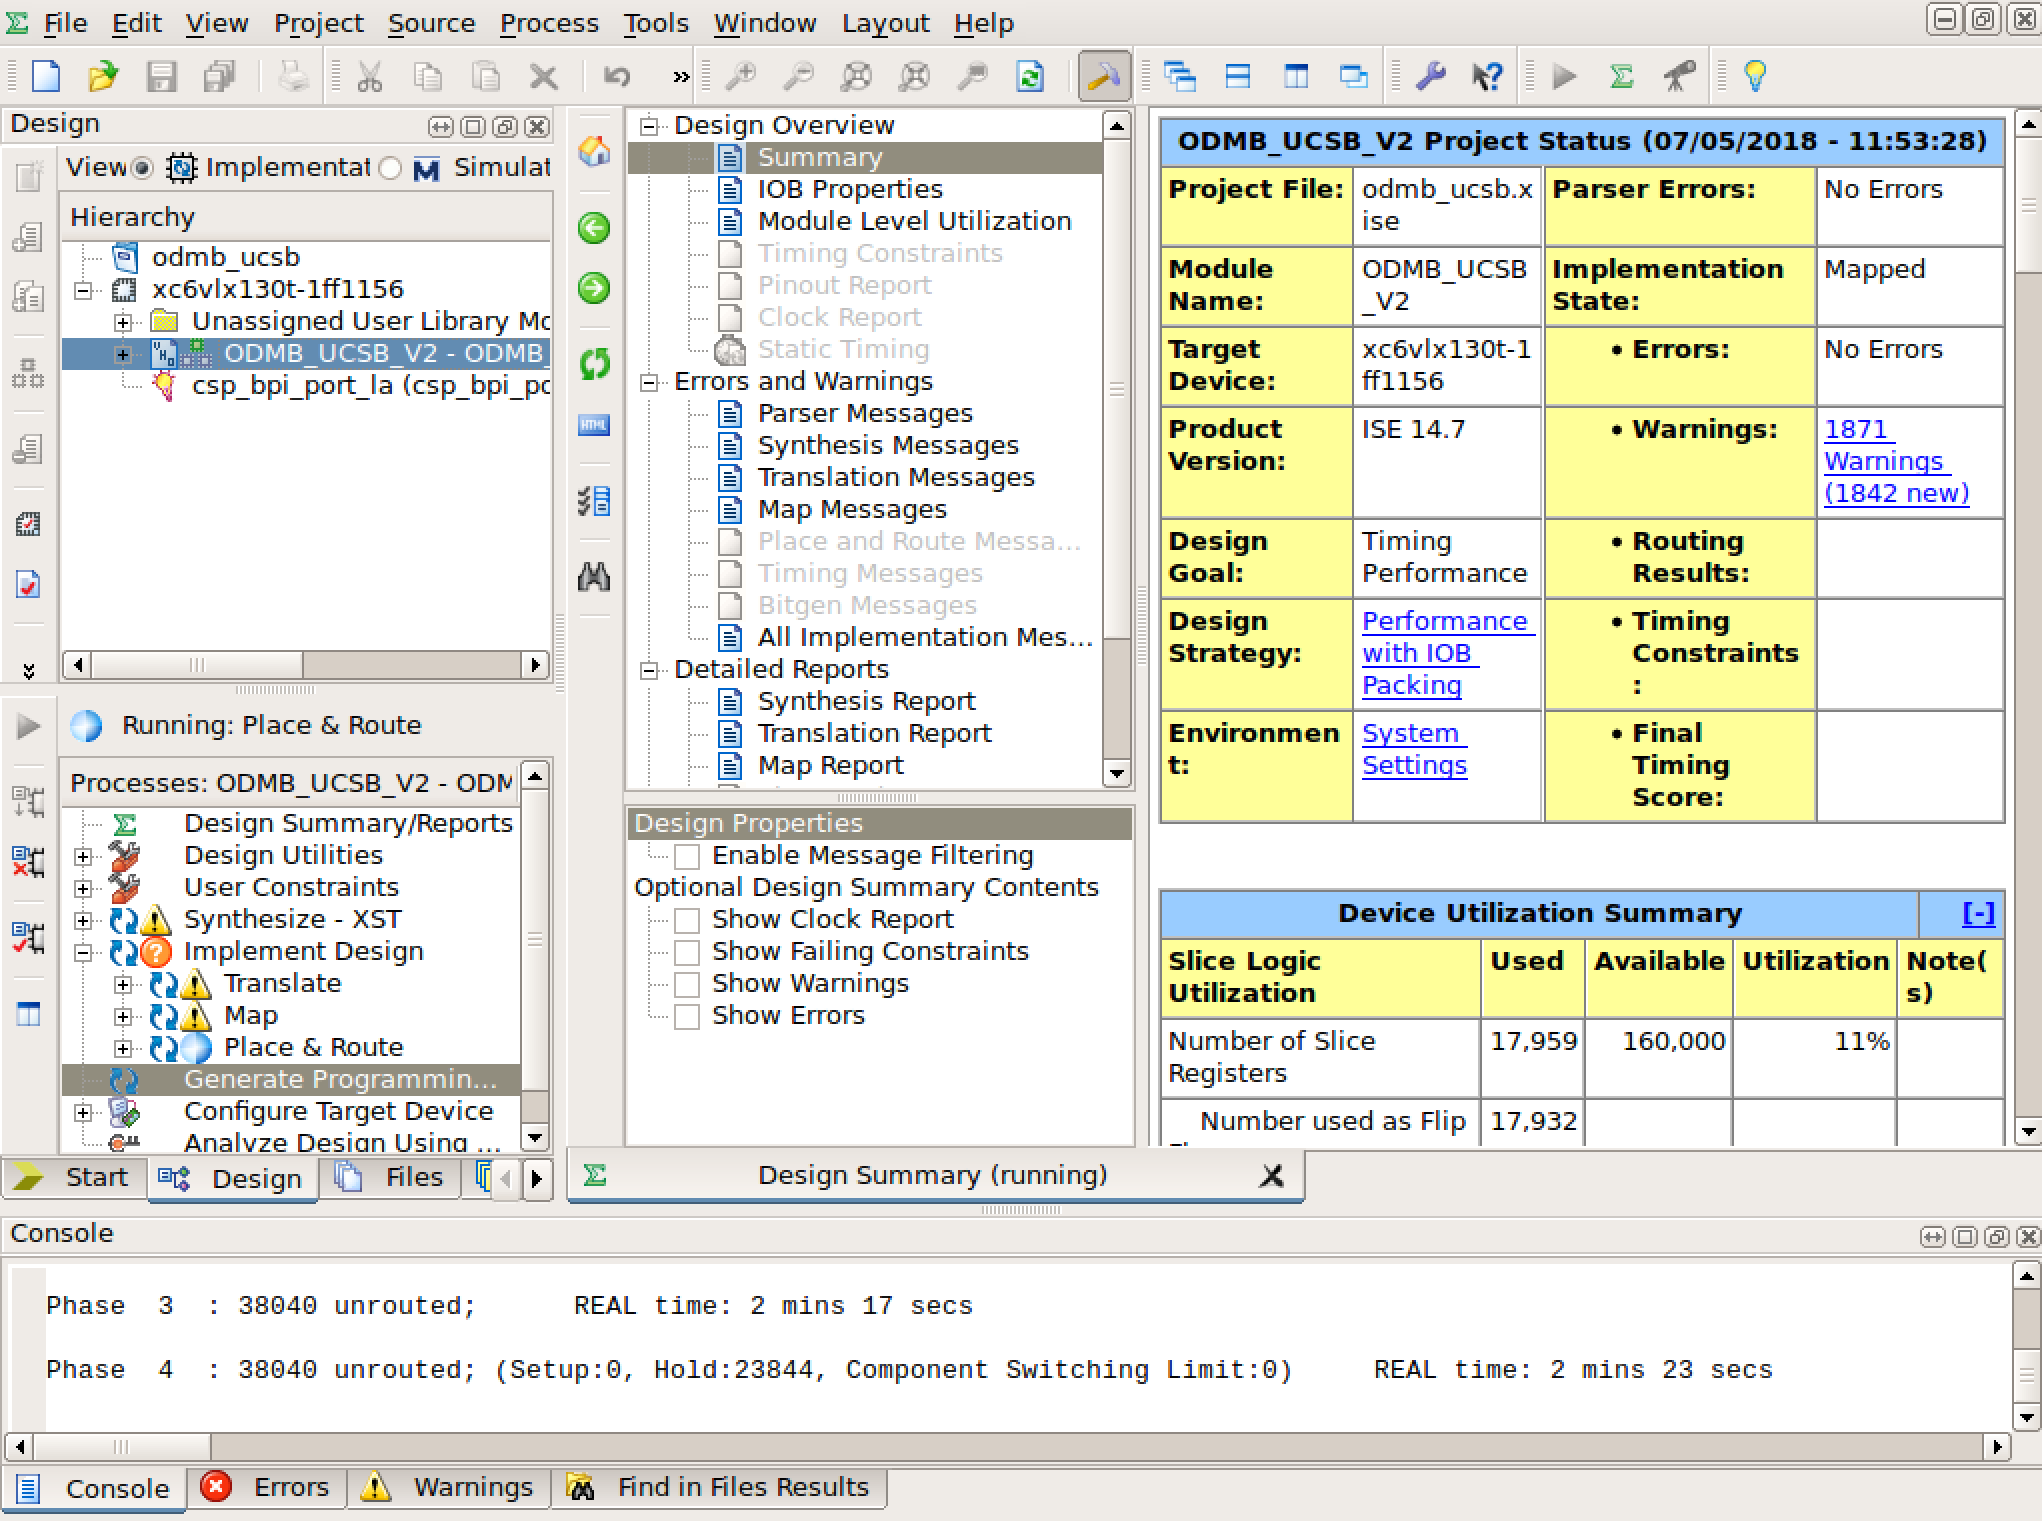
Now that you have updated the version tag, double click on ‘Generate Programming’ in the bottom left list to begin the synthesis process (shown in Figure 2). This will take about 15-20 minutes, and will produced a .bit file in the odmb_ucsb_v2 directory.
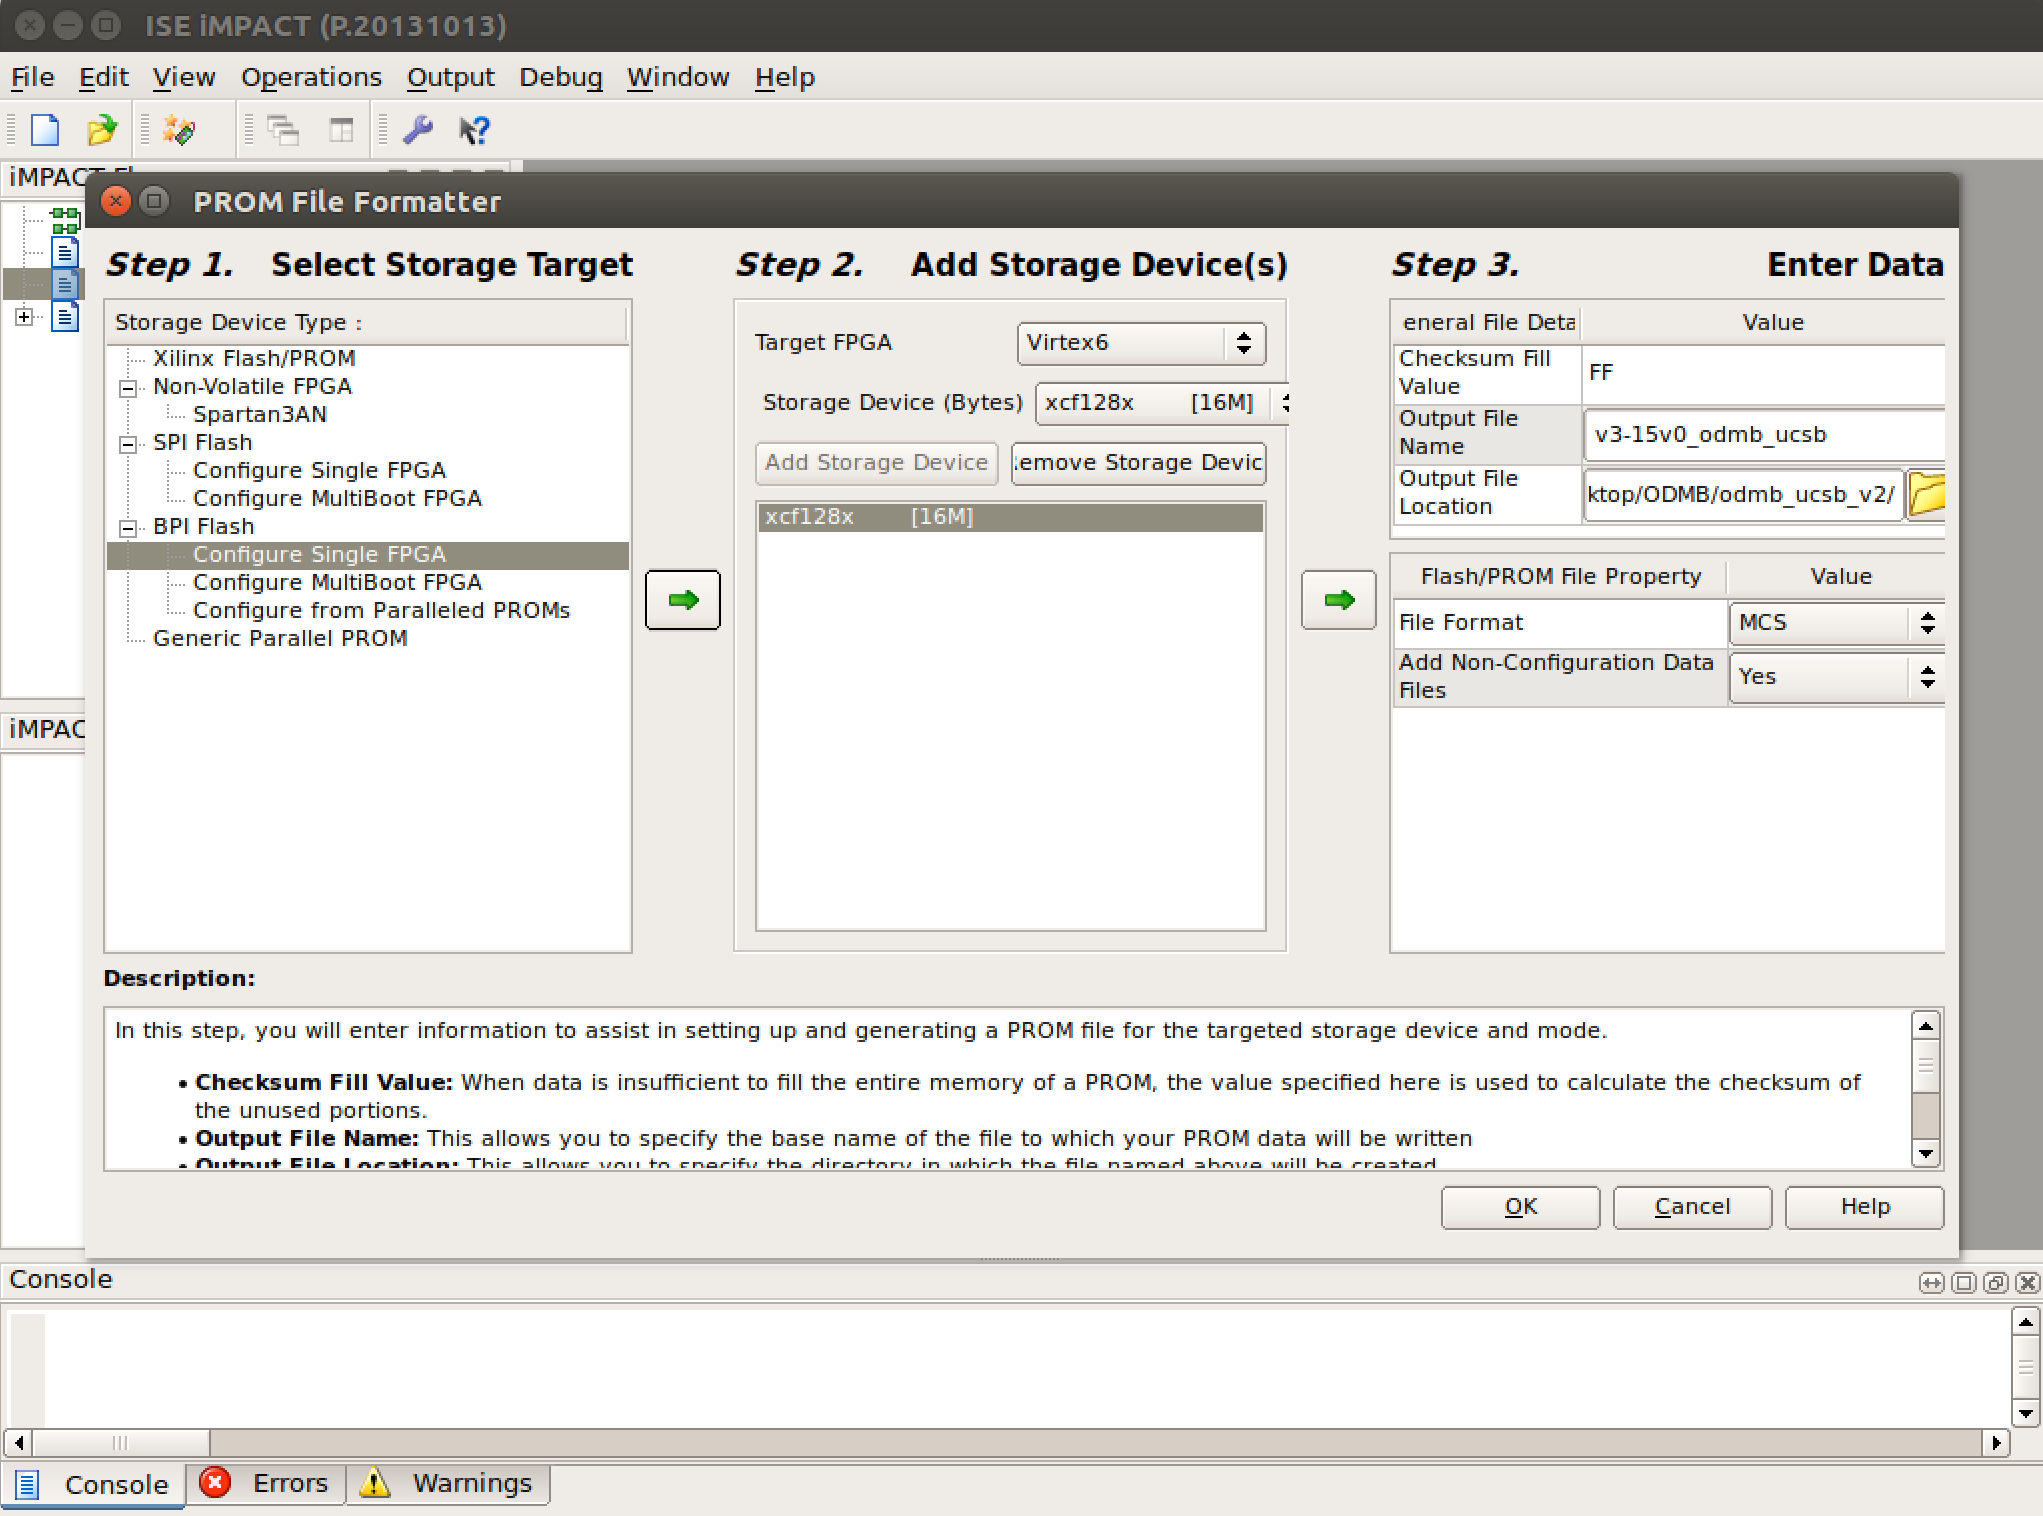
You will also need to produce a .mcs configuration file for the fpga. To do this, launch iMPACT from the ISE Tools menu. This may take a few minutes to start up. Once it has launched, double click on ‘Create PROM File’. In the produced window, select ‘Configure Single FPGA’ under ‘BPI Flash’ in the ’Storage Device Type’ list. In the target FPGA pull-down menu, select ‘Virtex6’ and click ’Select Storage Device’. You will see the created object appear as the only item in the list under these options. Select this device, then use the green arrow to move onto the third step. Next, you will want to change the output name of the file the whatever the name of the .bit file you created earlier was, and then choose yes for the ‘Add Non-Configuration Data Files’ option. Once you have done this, your window should look like that shown in Figure 3. Finish the process by clicking OK at the bottom of the menu.
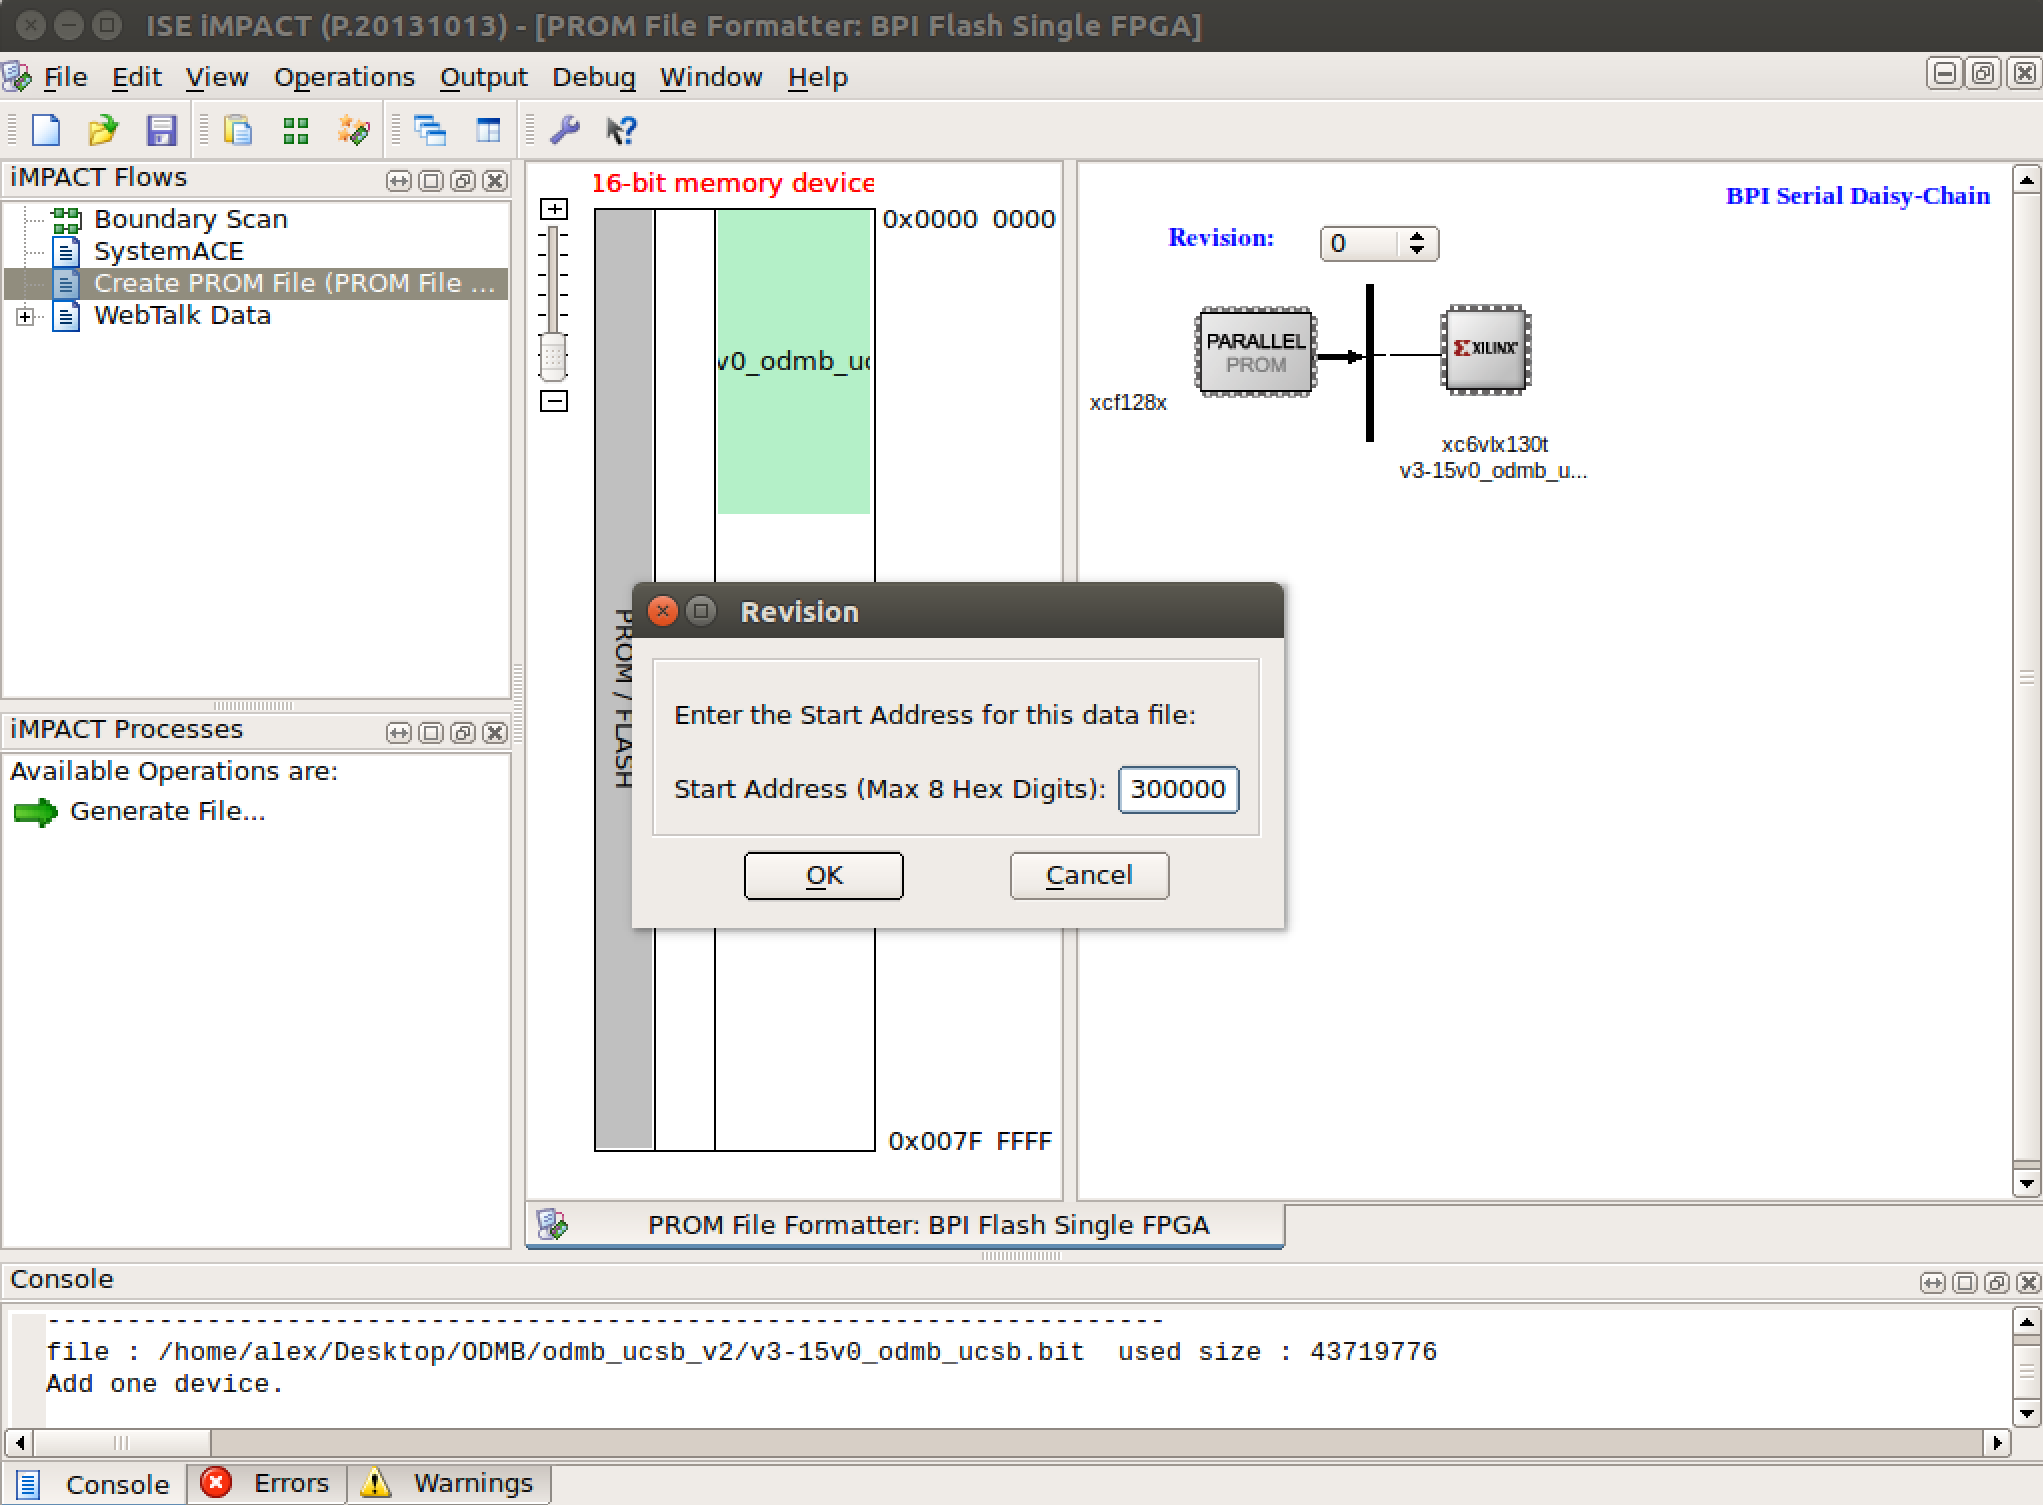
You will next be prompted to select the device you would like to use. Choose the .bit file you previously created (select no when prompted to add another device). When asked if you would like to add a data file, select yes and enter ‘300000’ as the start address (shown in Figure 4). When selecting the data file, you will need to change the ‘Files of type’ option to ‘All Files’, and then select the file ‘odmb_toprom.hex’ (select no when prompted to add another data file). Next, you will be shown a review of the select options. Once you verify that everything looks correct, select ‘Generate File…’ and the .mcs file will be created! Once this process is complete, you can quite iMPACT (no need to save). You will now have the four necessary files in the same directory the .bit file was created: .bit, .cfi, .mcs, .prm. It’s a good idea to make a separate directory for these files in order to keep them organized.